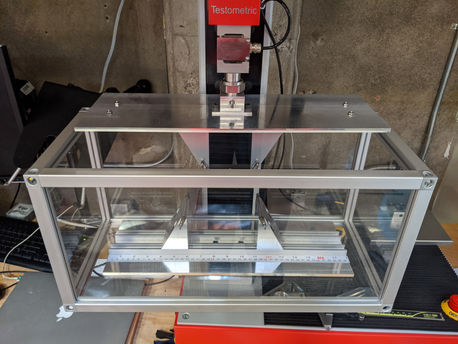
ASTM C-158 Test Fixture
Determining the Strength of Glass by Flexure

Overview
Key Challenges
Designing to ASTM Standards
Staying within budget
Feature to adjust length
Skills Applied
CAD Modeling (SolidWorks)
CNC Mill
Laser Cutting
In-House Fabrication
Iterative Design
My Role
Mechanical Engineer - Team of 1
Synapse Product Development
San Francisco, CA
Year
February 2020
About
This test fixture was constructed to determine the strength of glass by flexure. It was designed to meet the standards and requirements of the ASTM C-158 test. The test consists of applying a uniform force to a glass sample until failure.
Synapse's client used the test results to inform their decision on a material for their developing product.
System Overview

Initial Design Considerations
Goal
Determine the Flexural Strength of Glass Samples
Options
1. Outsource Testing
2. Purchase Test Fixture from Vendor
3. Design and Fabricate In-House
Decision - Design and Fabricate In-house
Fastest Option, within budget, and can be customized to in-house testing capabilities.
ASTM C-158 Test Requirements


Preliminary Sketches
Support Rollers Concept
-
Two blocks supporting 1/8" pins
-
Rail to adjust distance between supports
-
Tap block and fix to rail with a screw
-
Consider how support rollers will be prevented from spinning

Loading Noses and Shard Containment Concept
-
Plastic OTS container to catch glass shards
-
Pins, screws, rail can be found OTS
-
Base plate and support blocks can be CAD modeled and custom ordered
-
Loading noses will be identical to support rollers
-
Load applicator must be compatible with in-house tensile tester

Subcomponent & Feature Design
Support Blocks and Rollers
1. Brainstorming: Three options were considered to prevent the roller from spinning. I chose Option 3 because it requires the least amount of machining and a simple assembly of OTS components.


2. Bending Analysis: How much deflection can we expect to see in the glass sample? This will determine how high the support walls can be for the rollers.
I applied the beam deflection equation for a simply supported beam to this system.
-
Range of dimensions
-
12" x 3" x 1/4"
-
6" x 1" x 1/4"
-
-
Range of forces
-
500 lbs - 1000 lbs
-
Results: The maximum deflection should not exceed 0.9 inches


2. CAD Modeling: The support blocks were designed using SolidWorks. They will fit on a 18" T-slotted rail and can be adjusted for samples up to 14" long. The triangular geometry reduces material without compromising support.


Deflection Simulation: I sketched an arc on my CAD model to represent the maximum defection of a glass sample. As seen below, the walls will not interfere with the glass as it deflects.


4. Fabrication: The support blocks were custom ordered from a machinist. The pins and O-rings were purchased off the shelf.


Adjusting Distance Between Blocks
1. Component Selection: The availability of OTS components and their cost drove the decision for choosing an adjustable mechanism. The distance between blocks needed to be adjusted for various sample sizes. Options 2 is cost effective and easily assembled.

2. Detailed Component Sketch: There would be two tracks to support the width of the samples. The tracks would be bolted to a base plate to ensure the sample is resting flat. The OTS and custom components were identified.


3. CAD Modeling: OTS The blocks include clearance holes for 1/4"-20 screws. I created an assembly in SolidWorks with all of the components I planned to include.


4. Fabrication: The rails were carefully centered on the base plate and bolted in place. The blocks slide freely and can be spaced apart accurately using the measuring tape. They are tightened using a hex key.
Attachment to Testometric
1. Concept Ideation: Using a hole and pin method, the test fixture would be able to attach to the in-house tensile tester. A custom part would need to be machined to fit the exact dimensions.
2. CAD Modeling: The part was modeled in SolidWorks. It includes two holes on the base that can be bolted to the fixture's base plates.


3. CNC Procedure: I fabricated the part using a CNC mill with a program written on HSM Works. I created 2 of these parts. Click through the gallery to see my step by step procedure.
Shard Containment
1. Concept Ideation: I brainstormed three different shard containment options including a storage container, a custom built container, and a curtain. After taking measurements of the testing space and trying to fit a storage container, I realized that a custom container was the only option that would meet all of the requirements. It would be a safe and effective option.
2. Building the Shard Container: The custom container was built using 80/20 framing and acrylic panels for walls. The test fixture was bolted to the base of the container after assembly.
3. Removable Lid: The lid has a cut out that slides on and off between tests. It is located and held in place using magnets.
Test Instructions
Conclusion

The test fixture was completed on time and stayed within budget.
It is available for anyone at Synapse to perform standard glass testing.
Prior to designing this, I made a test fixture that was used for testing large glass panels at a testing facility. Follow the link below to see the large panel fixture that was built under a time constraint of 4 days.


